Beach Themed Pina Colada Cake
- Hannah Prinz
- Apr 28, 2021
- 8 min read
Updated: Feb 4, 2022

I have been dreaming about a beach vacation for months! All I want to do is lay on a beach, splash around in the ocean, build sandcastles with my kids and DRINK A PINA COLADA!
Alas, a beach vacation is not on the horizon, at least not soon, so I thought the next best thing would be a Pina Colada cake. Everything that you love about Pina Coladas are packed into this cake.
3 layers of Coconut Cake
A Fresh Rum Pineapple Filling
Coconut Cream Buttercream.

This cake itself is unbelievably moist, packed with coconut flavor, but dense enough to create stability to make stacking and decorating your cake incredibly easy. The freshness of the pineapple and the flavor of the rum break up the sweetness in the cake. Then the ultimate smooth finish of the most luscious tropical buttercream will transport you to your favorite island vacation. Fondant seashells and cookie crumb 'sand' are of course optional. Can you believe this entire cake is gluten free?
Get me on a plane and on a beach! I'm ready!

Making this cake (minus the fondant decorations) was actually very simple. Plus all of the components can be made ahead of time. The cake layers can be made up to a month in advance. The pineapple filling as well as the coconut buttercream can also be made a few days before assembly. I hate baking and decorating all in one day. It is just too much work and when you have little kids running around, it creates a stressful environment. So save yourself some unnecessary yelling and bake your cake and make the other components well in advance.
I'm not kidding, any beginner baker can make this cake.
Do you have to go ALL OUT and do these beach fondant elements or buttercream waves? No, you don't. Be creative and do as much or as little as you want. It was my birthday when I decided to make this cake, so you know I had to go all out! I wanted to transport myself to a Caribbean beach.
If you don't love working with fondant or just don't have the time, no worries. You can easily decorate this cake with a layer of buttercream and some fun swirls of more buttercream on the top. Add in a few fresh pineapple slices and some maraschino cherries and you got yourself a fantastic Pina Colada cake.
I do want to help you with some tips and tricks of baking and decorating this cake. Let's go step by step and start with...
The Cake Layers:
This cake is bursting with flavor and is so moist, why? We are going to use 3 different types of milk: heavy whipping cream, buttermilk, and coconut cream. I love using buttermilk in my cakes. Not only does it help to cut the sweetness, but buttermilk will make your cakes just a little bit more dense ensuring a very stable cake, which is great for stacking.
Here are all the ingredients that I used for the cake.

YES, there is rum in the cake itself! Can you really taste the rum in the cake layers, probably not. However, I do think it adds a nice flavor.
I want to highlight the coconut extract that I used:

I read in one of the cake baking groups that I am in that people swear by this brand of oils to use instead of a typical extract for flavoring their cakes. They all said that LorAnn Oils are the most superior, and I have to agree. The bottles are SO tiny but all you need are a few drops.
You can easily order LorAnn oils on Amazon.
What I love about this recipe is that it produces flat perfect layers of cake. After they cooled enough to get them out of the pans, I wrapped them in plastic cling wrap and then some tin foil to then put them in the freezer. It's ok to wrap them up if they are still a little warm. This will actually keep in the moisture helping your cake not to dry out when they defrost.


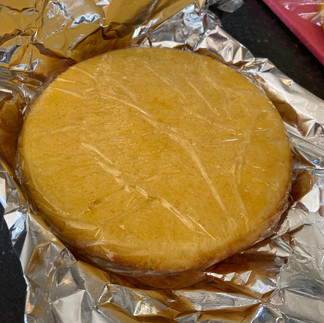


Do you have to freeze your cake layers. No, but you should. In the past I didn't and doing a crumb coat with my first layer of buttercream was much harder to accomplish with a room temperature cake than with a hard frozen one. Plus when your cake defrosts, it still retains all that moisture. Did you really think I would give you a recipe for a dry cake?
The Pineapple Rum Filling:
This filing is AMAZING! Seriously I am so happy that I doubled this recipe because you can just eat it straight from the spoon... it is that good. I also wanted to make a filling with rum and another filling without the rum. The kids have to eat cake too. (I ended up making the kids some mini Pina Colada cakes without any alcohol).

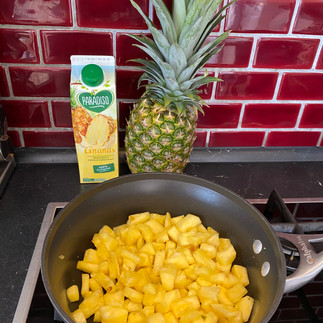


You can use canned pineapple but I love it fresh. Canned pineapple is too sweet and loses that tartness you get from a fresh pineapple. What I love about this part of the recipe is that it is SO easy. Basically just dump all your pineapple filling ingredients (not including the rum) into a saucepan. Bring it to a boil, let simmer, then use a masher to mash up the pineapple pieces. It doesn't have to be smooth, small pieces of pineapple are the goal.
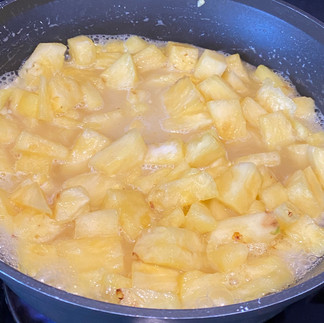
Here you can see the mixture has thickened and reduced quite a bit. After a few more minutes I added the rum.
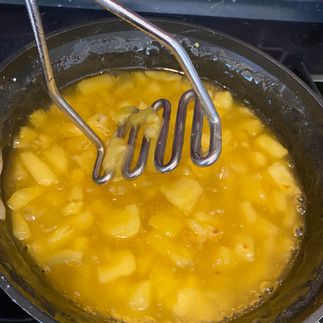
And I added a lot! No, not really, but I did make sure to sample a little bit. I wanted to make sure that I could taste the alcohol in the pineapple filling. Make sure to taste test at this point. You can always add more rum to the mixture.

After another minute or so I let the pineapple rum filling cool and then I stored it in an airtight container, in the refrigerator, overnight, before using it to fill my cake.
The Coconut Cream Buttercream
I do not have any pictures or videos or wise words here. Follow the steps in the recipe and you will have the perfect buttercream. Don't skip the 10 minutes of whipping your butter on high. This step guarantees a smooth buttercream. It also helps the butter to absorb the powdered sugar so that you don't have this gritty taste.
Taste test as you add in your coconut extract and coconut cream. You can always add more.
The Assembly:
This is my favorite part. I love stacking cakes. In just minutes all your hard work comes to life.
Grab a cake board and put a spoonful of buttercream in the center. This will act as your 'glue' so that your cake is not sliding all over the place.
First, make a ring of coconut cream buttercream creating a dam. Then spread your buttercream all over the top. Add in your pineapple rum filling. Then if you realize your dam is not has high or wide as you think it should be, then just add a second ring of buttercream.


Repeat this step with the second layer of cake. Then top it off with your final cake layer. Spread or pipe buttercream all over, creating a crumb coat (a thin layer of buttercream to trap the crumbs). Refrigerate your cake for a minimum of 20 minutes. This will help harden the buttercream and set the cake. Then you can add your second layer of buttercream. Refrigerate again. At this stage you have to decide how you want to decorate your cake. You can add more buttercream elements, colored with gel food coloring. You can cover the entire cake with fondant. You can just pipe some swirls of buttercream on the top of the cake and add some pineapple slices and maraschino cherries and call it a day.
I went for the option 'add more buttercream elements' by dyeing a small bowl full (about 1 cup of my coconut buttercream) different shades of blue. I took that 1 cup of buttercream and separated it in half. Dyeing one part dark blue and the other part light blue.

I dabbed buttercream on the bottom half of my cake.

Then I used the back of my offset spatula to create the waves. I didn't want a 'perfect' wave look. I wanted it to look more abstract with an ombre feel.
Then, I got to work on my fondant decorations. Of course this is optional but I ordered some new fondant sets and I couldn't wait to try them out. You don't need to spray these or really do anything special except to clean it first with soap and water.

Then it is like playing with Playdoh. Take your fondant and kneed it and roll it until it is soft a pliable.
TIP: Use vegetable shortening (Crisco) to help soften your fondant. If the fondant gets too sticky then use a little sprinkling of corn starch.
Then take a small ball and schmusch it into your molds.

To achieve this color I mixed some white and light pink fondant together. I also added a few drops of ivory gel food dye so that the shells had a more realistic look to them. These were my first attempts. I realized soon after that they were a bit too pink so I started again and added more white to the mix.

I used my fondant 'knives' to cut them out and then just laid the seashells to the side while I went to work on more. The shells were very easy once I found the color that I wanted to use.
What wasn't easy were the palm trees. These were SO hard and frustrating and I probably should have just not done them, but I was determined and stubborn so I had to make it work. Even Though without the palm trees, the cake looked incredible!


I used this youtube tutorial to help me with the construction:


I followed the instructions on the video and I thought I was doing great. (Yes, I know the palm tree trunks look like giant turds on sticks... my kids got a huge laugh when they saw those drying in the kitchen.)
I even had my leaves dry just like the guy in the video demonstrated.

I was thrilled. Everything was going as planned. But when it came to attach the leaves, everything slid off and collapsed. The wires came out. Nothing held together. I was so frustrated. The guy in the video made it look so easy. It was not easy.
In the end, I cheated. Yes, I admit: I cheated.
I used super glue to attach the leaves and coconuts.
In the cake world, super glue is not permitted. Super glue is not edible. I should have used edible glue, but I didn't. This cake was just for me, my family and a few friends. I knew none of use were going to take a huge bite right out of the fondant palm trees.
Once I used super glue and let them dry, I thought for my first ever fondant cake topper, they were pretty decent. I know there are a few cracks and tears, but I was still very pleased with my hard work and determination.

Once the palm trees dried, I left them to sit on my kitchen counter. I didn't stick them into my cake until about 1 hour before we served it. You want your cake to still be cold when you put the sticks from the palm trees into your cake. They will adhere better when the cake is cold and firm. Then once your cake comes to room temperature just dig right in and cut yourself a slice.

I loved how the cookie crumb sand got EVERYWHERE... just like real sand. The cookie crumbs did add a nice texture to the cake itself, but maybe next time I won't use as much as I did.
That afternoon we all sat at my dining room table enjoying a giant slice of this rum filled Pina Colada cake with of course homemade Pina Colada cocktails. We ate, we drank, we played games and overall it was a fabulous beach themed birthday party.
Don't worry! I didn't forget about the kiddos. How could I? Actually, I do think the kids probably could have had a small piece of cake and would not have even realized that it had rum in it. But my conscious told me to do the right 'mom' thing. I had some frozen vanilla cake so once that thawed out, I used my circle cookie cutters and made little mini cakes. I still had some coconut cream buttercream leftover from my cake so I put all three colors into a piping bag fitted with a large open star piping tip. Remember, I also made a batch of non-alcoholic pineapple filling. Within 15 minutes I had these done and ready to go.


Let me tell you these were definitely kid and adult approved! I just wish I could actually be on a Caribbean beach. Someday....


You make it all look so doable, Hannah. I read your posts and find myself thinking sure, I could make a three layer cake. If I ever lose my mind and decide to casually whip up a cake, I'll make sure to use this one.